1. Using Headings to style section titles and subtitles
All headings and sub-headings of chapters in the paper must be formatted using a specific style. In MS Word, the desired formatting can be found on the Home tab in the Styles section. It is necessary to select the text and click on Heading 1 from the ribbon if it is the main heading. For the subsection, we will choose Heading 2. In Figure 1, you can see an example of the structure of the file and the associated headings.
Figure 1 shows the structure of the chapters in the .docx file

Figure 1 chapter structure in the .docx file
Word will apply the desired formatting, but there is a possibility that it will change the colour, size and font type. If this happiness, you can modify the existing styles later. It is necessary to click the right mouse click on the desired style and select the Modify command from the drop-down menu. In the window, you can adjust the desired settings and confirm everything with OK.
In the video, you can see the process of applying the appropriate styles to the document structure and changing the styles according to your own preferences.
| NOTE: The title of the paper is not formatted using styles. |
|---|
2. Insert page numbers
The pages of the document must be numbered correctly. On the Insert tab, click the Insert page number, from the drop-down menu select Bottom, while page number alignment is not important in this case. Do not manually enter page numbers into the document.
A short video shows page numbering in a .docx file.
3. Header and Footer
The header and footer are empty spaces at the top and bottom of the page where information such as name, work title, date, page numbers, license images, DOI number, etc. are entered. In header and footer you will not put the text of the paper but additional information about the paper, most often the name of the paper or journal is entered in the header, while the page numbers are entered in the footer. To enter information in the header or footer, select the Header & Footer from the Insert tab. The upper and lower parts of the document will be activated, in which it is possible to enter the desired data, while the rest of the document will be deactivated. When you have finish working in the header and footer, on the Header & Footer Tools or Design tab, select Close Header and Footer. The text in the header and footer will be greyed out and it cannot be selected or edited until the header and footer are reactivated.
The video shows the explained procedure of working with header and footer.
4. Footnote
If the paper contains footnotes, those in the .docx file must be correctly inserted. To create a footnote, you need to position the mouse next to the desired word and select the Footnote on the References tab. When you have inserted the footnote in the desired place, enter the text of the footnote. In a short video you can see how to insert footnotes into a .docx file.
5. Formulas
For the formulas to be properly displayed in XML, they need to be correctly formatted in the .docx file. One way is to insert them into documents as images, which will be displayed in XML. Another option is to edit the formulas in the .docx file using Equations, found in the Insert tab. The lower part of the button opens a drop-down menu where you can select different options depending on the formulas you want to create. If none of the options suit your needs, you can select Insert New Equation, which opens the Equation Tools and Design tab, providing all the necessary commands for editing and creating various formulas. Formulas created in this way will be displayed correctly in XML format. If you prefer to use MathML, note that formulas written in MathML will be converted into images by the JATS XML Converter. To ensure proper conversion, use MathType within Word to insert equations by opening MathType as a standalone application or using the integrated MathType add-in in Word. Then, go to Preferences > Cut and Copy Preferences, select Equation for application or website, and choose MathML 2.0 (namespace attr) from the drop-down menu. After formatting the equation, copy and paste it back into the Word document using Insert > Equation. Formulas converted in this way will be recognized correctly by the XML converter.
To delete an inserted formula, select the symbol with three dots on the left side of the inserted formula and press the Delete key on the keyboard.
In the video, see how you can enter and edit formulas in a .docx file.
6. Images
If the work contains images that the author sent as a separate attachment, then they must be inserted into the .docx file.
To insert the image in the document, position the mouse inside the document where you want to insert the image. On the Insert tab, select Pictures and find the picture you want to insert from your local computer. It is important that the image is positioned within the text of the paper.
The video shows the proper way to insert image into a .docx file.
7. References
In order for the references within the document be linked to the list of references at the end of the document, they must be edited according to certain guidelines. Each reference within the paper must be marked as a bookmark.
Each reference in the reference list should be numbered. To number references, you need to select them with the mouse and click the button Numbering on the Home tab. A sequential number will appear in front of each item in the list.
After that, you will start marking the references as bookmarks. It is necessary to mark the first reference in the list that have the mark of sequential number one. On the Insert tab, click on the Bookmark button. In the newly opened window, in the input field Bookmark name, write the label r1 and confirm everything with the Add button. You must repeat the process until you mark all the references in the list. For example, reference number two will have the bookmark r2, reference number three will have the bookmark r3, etc.
| NOTE: Bookmark names must begin with a letter. They can include both numbers and letters, but not spaces. If you have to separate words, you can use underscore (_) - for example First_reference. |
|---|
Figure 2 shows a paper with 10 references marked with 10 associated bookmarks.
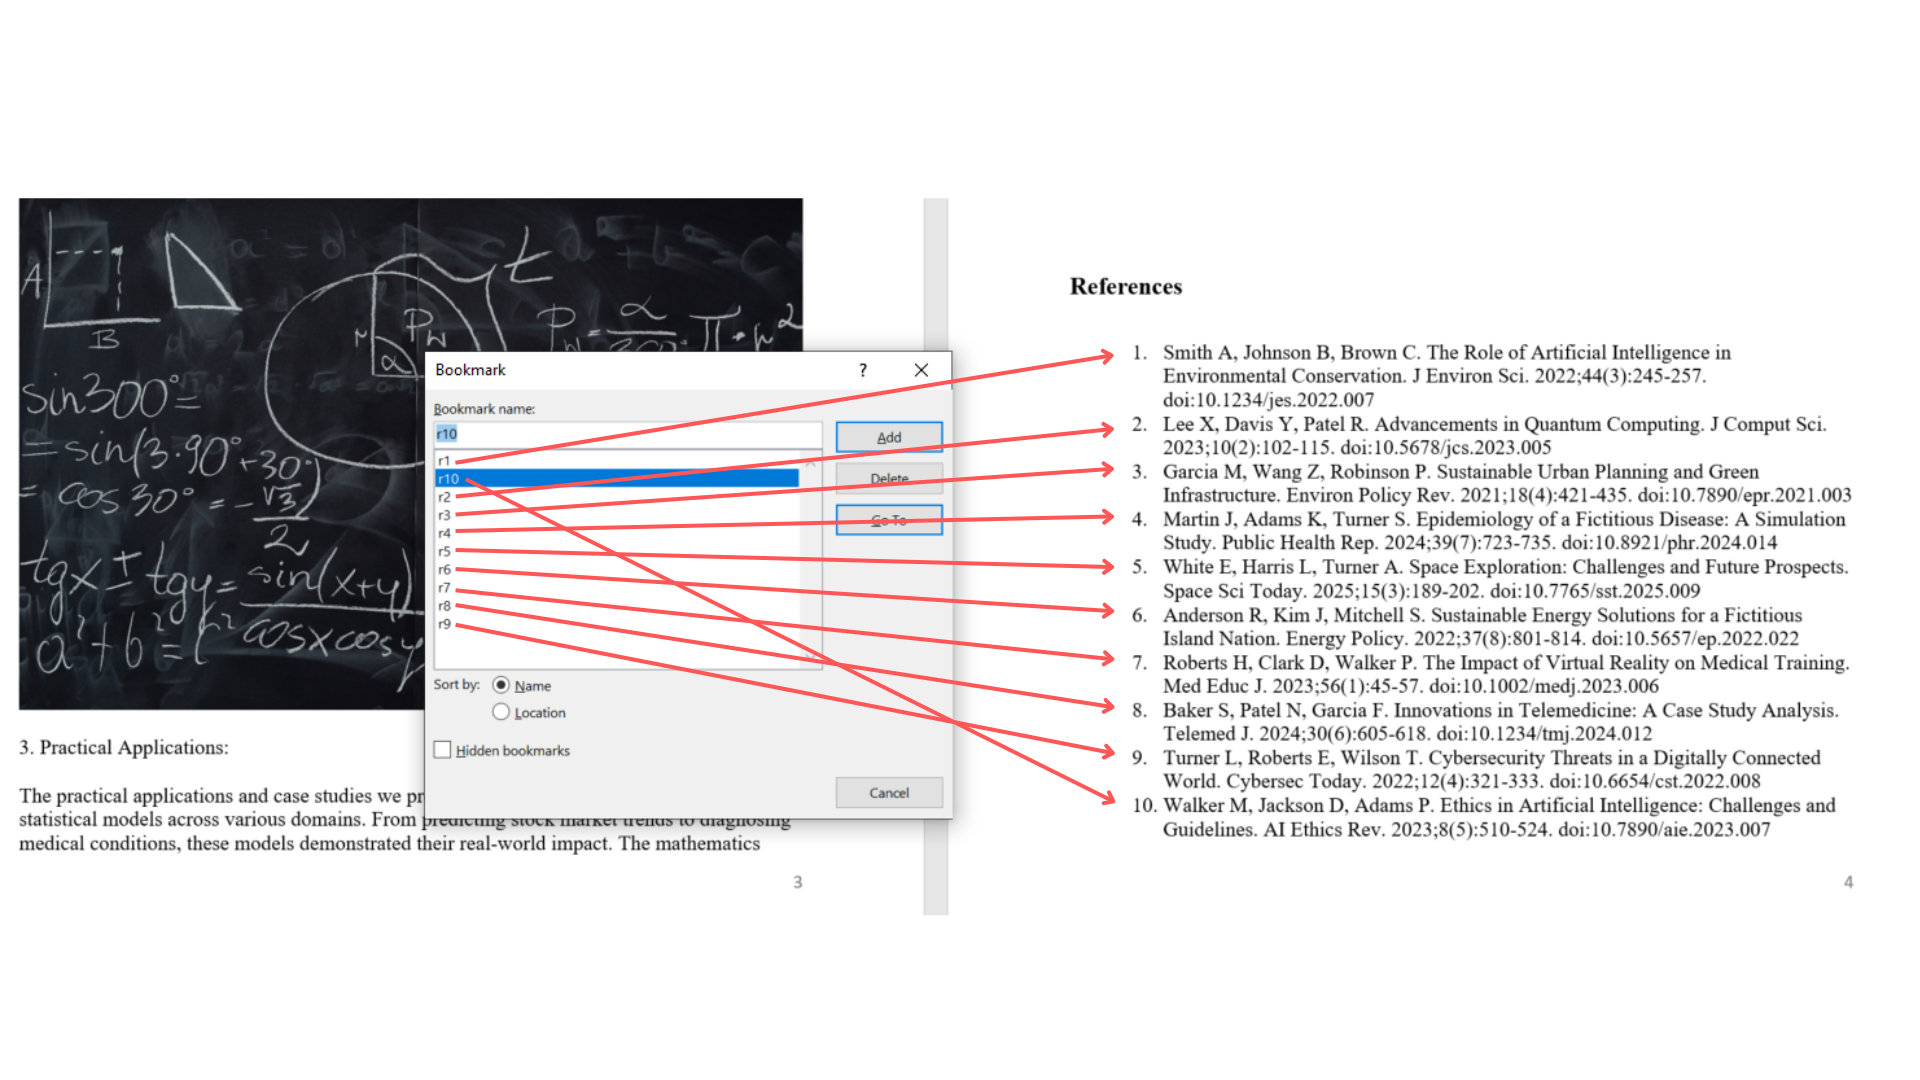
Figure 2 shows a list of bookmarks in a .docx file
The next step is to link the references in the paper to the list of references at the end of the paper. Mark the desired reference within the text and select the Hyperlink button on the Insert tab. In the newly opened window on the left, select the Place in This Document button. A list of all the bookmarks you have created will be displayed. Click with the mouse on the desired reference mark and confirm with OK. Manually link all references within the text to the corresponding reference from the reference list at the end of the paper.
In the video, see how to create bookmarks and link them to the corresponding references as explained in the description.
8. Tables and borders
When tables from Word are converted to XML, all table borders are lost and must be added manually in XML. To add a border in XML, you need to add the @border attribute to the <table> element. An example is <table border="1"> where the number 1 indicates the width of the border.
Merged cells from Word are converted into separated cells and need to be merged manually through XML. To merge horizontal cells, it is necessary to add the @colspan attribute to the <th> or <td> element. To merge vertical cells, you need to add the @rowspan attribute to the <th> or <td> element.
Example of a table with merged cells in Word
| Horizontally connected cells | ||
|---|---|---|
| Vertically connected cells | ||
Example of a table after conversion to XML
| <th> | <th> | <th> | <th> |
|---|---|---|---|
| <td> | <td> | <td> | <td> |
| <td> | <td> | <td> | <td> |
Example of a table after edited XML
| <th colspan="2"> | <th> | ||
|---|---|---|---|
| <td rowspan="2"> | <td> | <td> | <td> |
| <td> | <td> | <td> | |
NOTE: Borders on tables can only be added to the entire table, not just to individual parts. Also, it is not possible to change the colour of the table borders. |
|---|