Invalidating the UNIC Student Status
API Integration - If the home university uses an API, the status of the UNIC student can be revoked via API.
Admin Portal - If not using API, the UNIC student status is revoked by the home university administrator via the Admin portal.
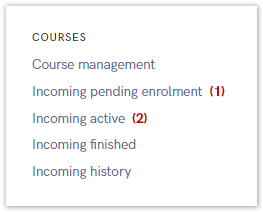
Figure 1. Course Menu Options
The menu includes five options:
- Course Management - For adding, viewing, and editing courses.
- Incoming Pending Enrolment - Includes sub-options for pending and approved enrolments.
- Incoming Active - List of incoming active students
- Incoming Finished - List of incoming students who have completed their activities.
- Incoming History - Shows students who have dropped out or been denied enrolment.
Course management
Course management allows administrators to perform various actions regarding courses:
- Add a New Course - Enter details such as course name, description, ECTS credits, local course ID, active status, and ISCED code.
- Edit a Course - Modify course details before the start date of the course.
- Course Instances - Manage different instances of a course, including adding new instances and assigning instructors.
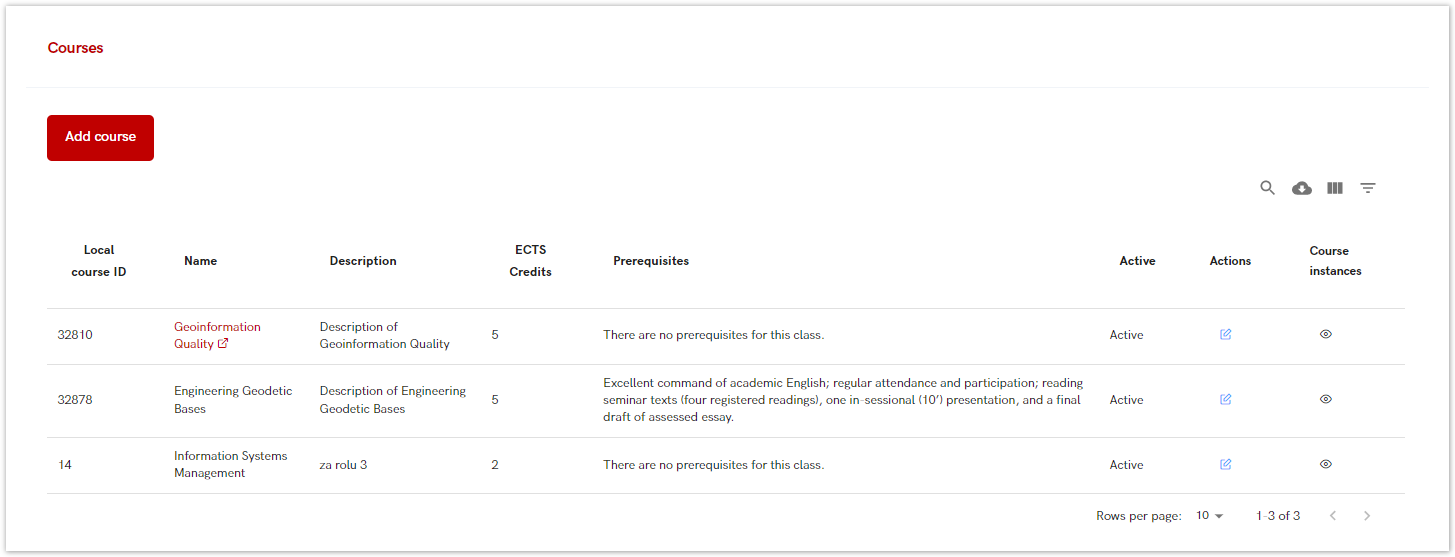
Figure 2. Course Management Option
Adding a new course
After selecting the Add course option, a new screen appears where the administrator enters information about the new course.
Required fields are: Course name, Course description, ECTS credits, Local course ID, information is the course is active or not and ISCED code.

Figure 3. Adding a new course
ISCED is the reference international classification for organizing education programmes and related qualifications by levels and fields. ISCED 2011 (levels of education) has been implemented in all EU data collections since 2014.
Administrator can type the programm's code or a name.
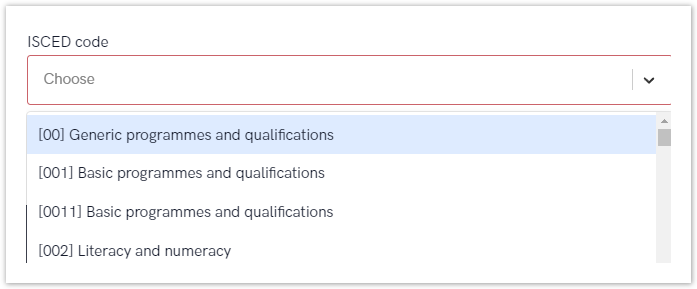
Figure 4. List of ISCED codes
Once all obligatory information has been provided, administrator can save the course.
Edit course
This option allows administrator to edit information about the course, no matter if the course is active or inactive.
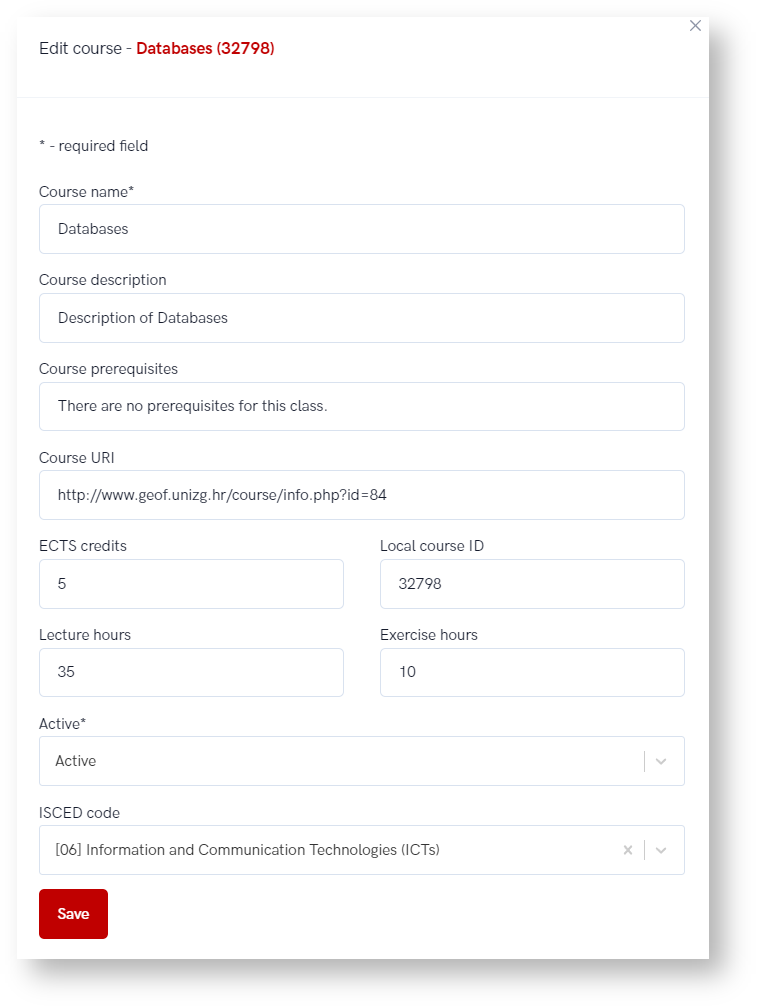
Figure 5. Editing Course Data
Course instances
Course instance is related to every course lecture in a certain period/academic year.
One course can have more then one instance in the same period of time or in a same academic year.
Active instances
Shows instances that have not yet passed the start or end dates. Allows modification and addition of instructors.
This option shows every active instance of certain course. A instance is active if it is still not pass the start date or an end date.
The main difference is that once the start date has passed, course instances can no longer be modified, but if the course hasn't started yet, an administrator can change the course instance information and add or remove instructors.
The following information are visible:
- Instance number - every instance have it's own number/code
- Academic year - when the instance will be held
- Start and end date
- Students quota – how many students can enrol
- Actions - there are two possibilities:
- no action available - if start date has passed
- editing information about course instance and adding/removing teachers
- Teacher - who will be the lecturer for specific instance.
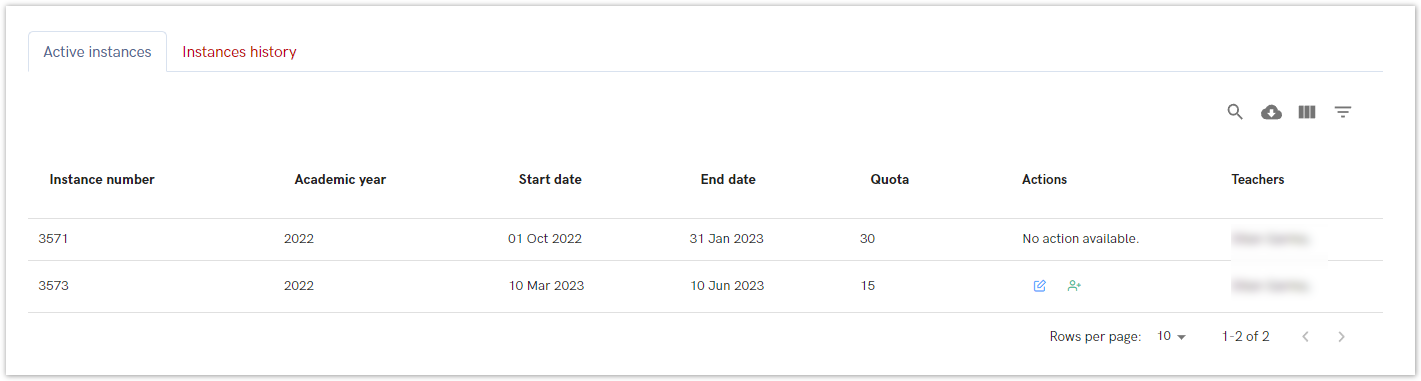
Figure 6. Active instances
Instances history
Shows completed instances with no available actions
The following information are visible:
- Instance number - every instance have it's own number/code
- Academic year - when the instance was the held
- Start and end date
- Students quota – how many students can enrol
- Actions - there aren't any action availableT
- teacher - who will be the lecturer for specific instance.
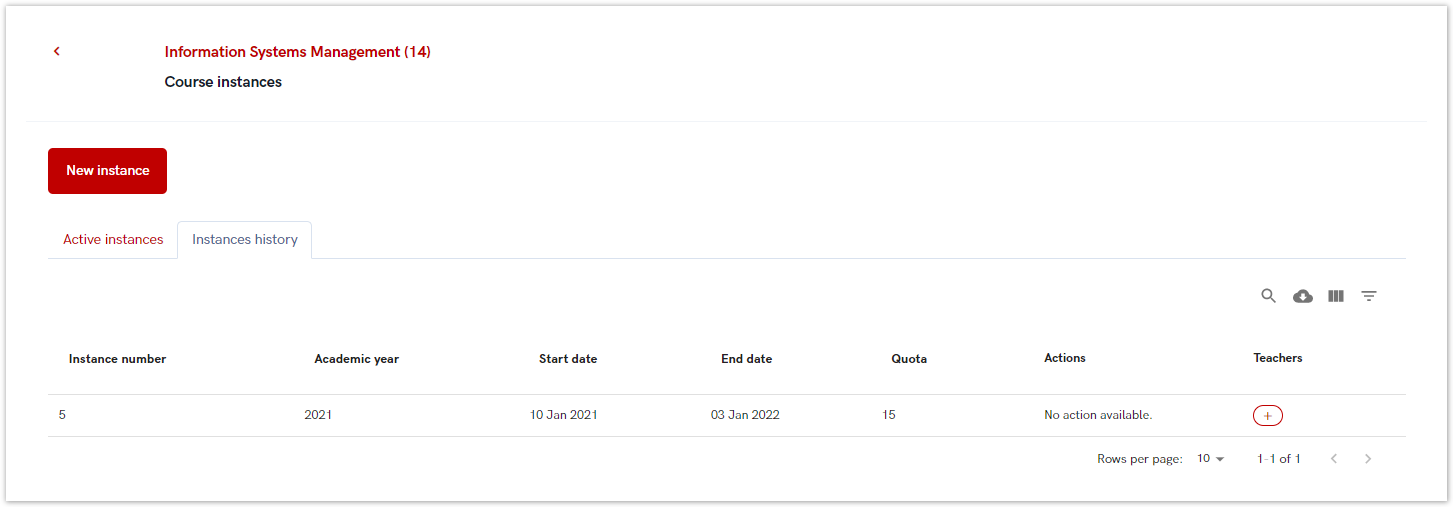
Figure 7. Instance History
Adding a New Instance
To add a new instance, the administrator must add following details: code, academic year, start and end dates, student quota, and teacher.
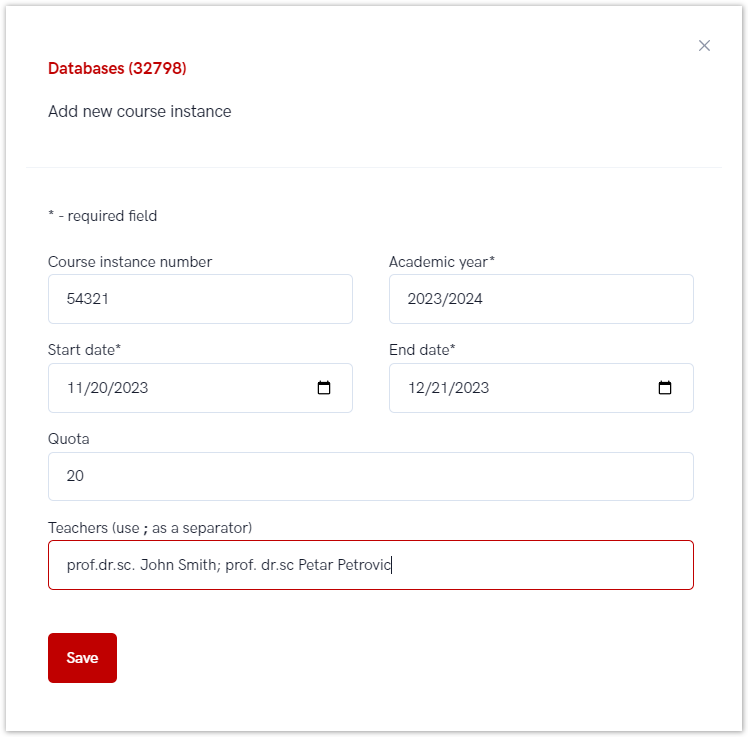
Figure 8. Adding a New instance
Incoming pending enrolment
This option allows administrators to manage pending enrolments of incoming students.
The administrator can view all courses for incoming students which did not yet started (in statuses 2 to 6). For more information about status, please visit site: Status explanation
There are two tabs:
- To do - Lists students awaiting approval.
- Info - Shows students who have been rejected or withdrawn.
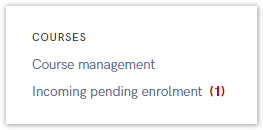
Figure 9. Active Request in Incoming Pending Enrolment
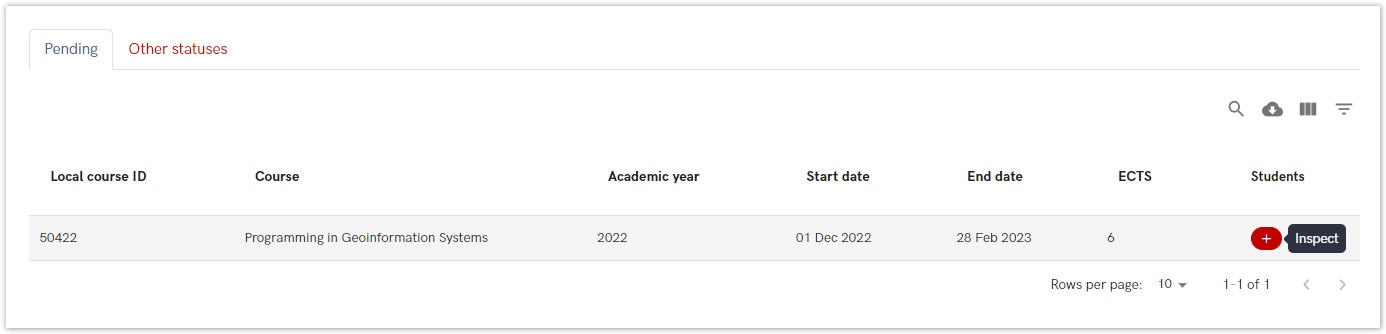 Figure 10. List of students with Pending Enrolments
In both tabs administrator can view following information:
- Local course ID
- Name of the course
- Academic year
- Start and end date
- ECTS credits
- Students.
For administrator to accept or denies student's incoming enrolment, the pending tab must be selected, then the Inspect options (plus sign) as shown on the Figure 10.
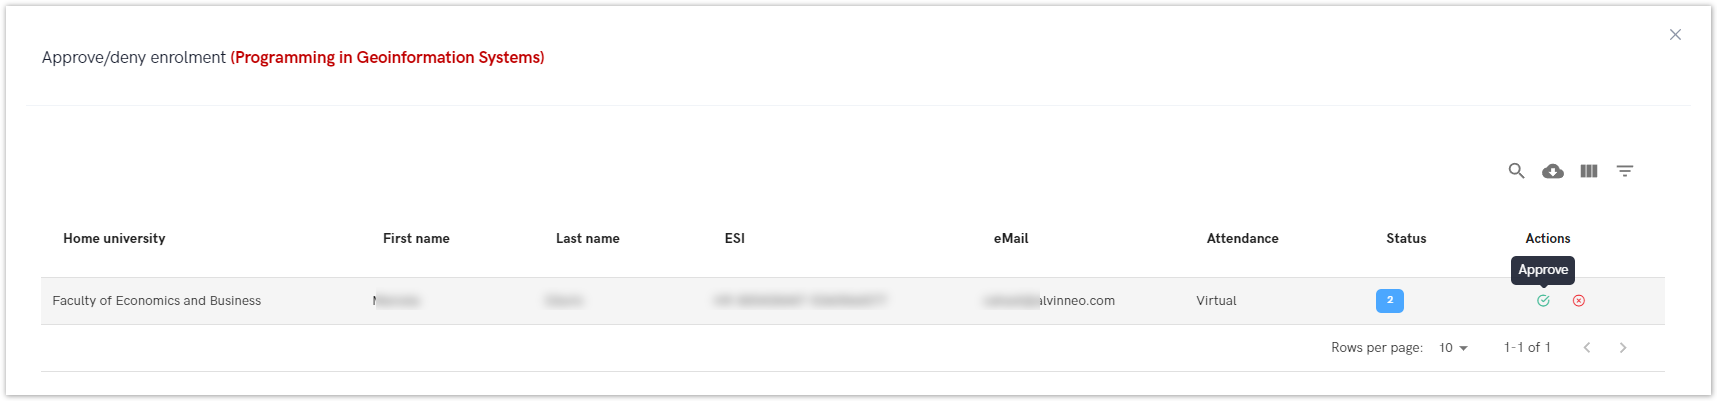
Figure 11. Approving or Denying Enrolment
A new screen appears with the following information:
- The course the student wants to enroll in,
- Home university,
- Student's name and surname,
- ESI
- Method of attendance,
- Status (2-home uni approved).
After reviewing the information, administrator takes a action: approve or denies student's application.
In the Other statuses tab, the administrator can view details of rejected or withdrawn students. For administrator to view information about students, the plus sign must be selected (option Inspect).
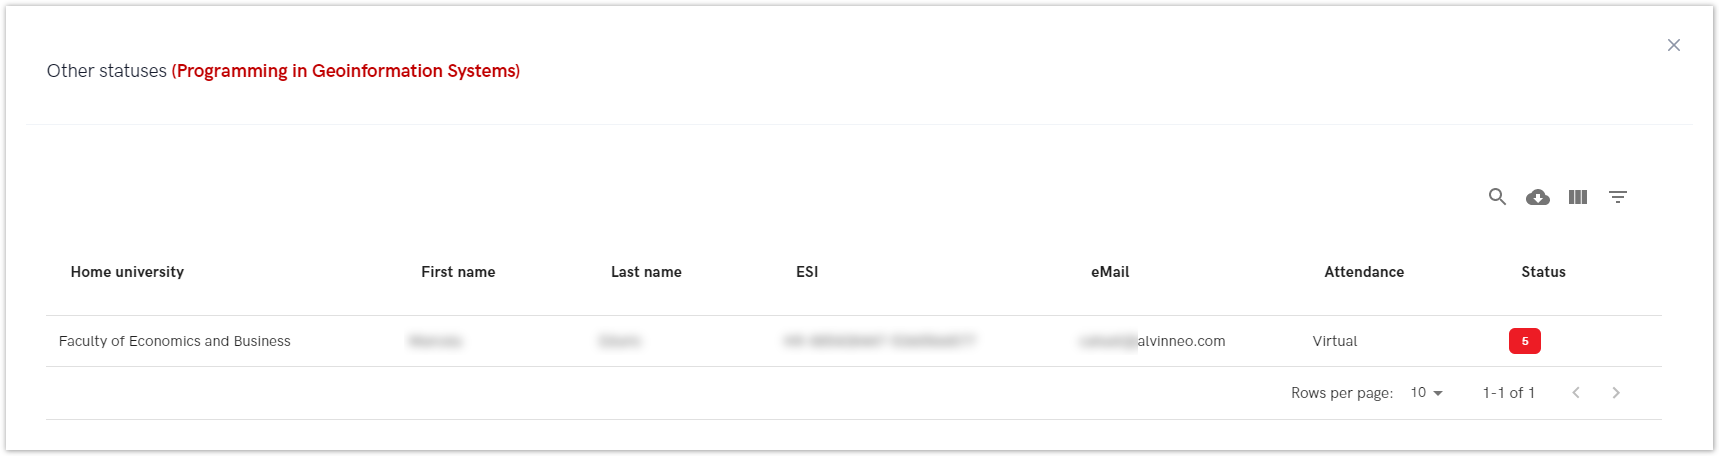
Figure 12. Incoming Enrolment - Other Statuses Tab
Incoming active
View information about incoming students whose courses have started and register grades.
To register the grade, administrator must select the course and option Register grade (plus sign) as shown in Figure 13.
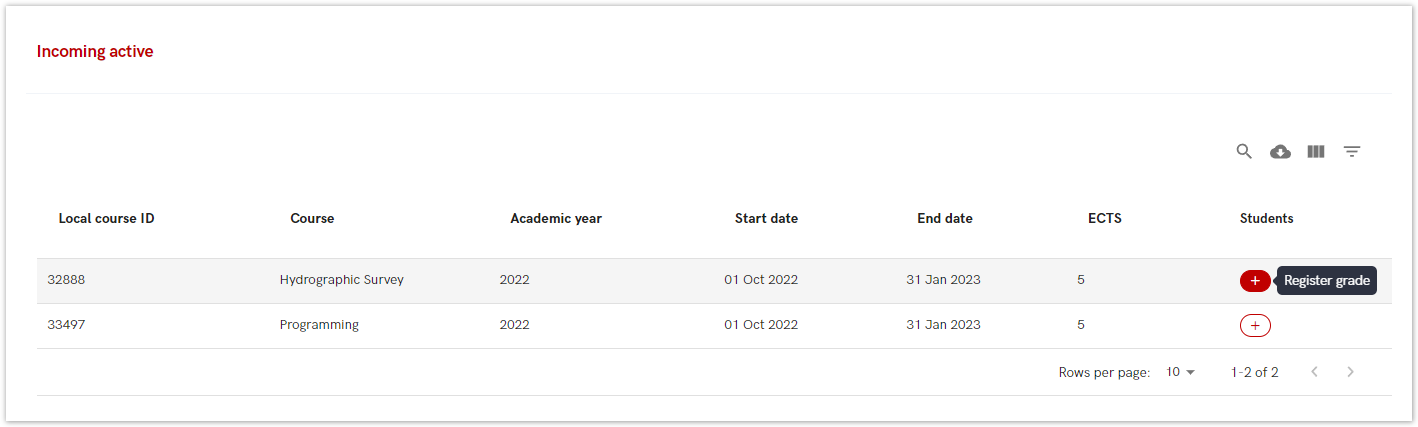
Figure 13. Information about Incoming Active Courses/Students
A new screen appears with the following information:
- Course name
- Home university,
- Sudent's name and surname
- ESI
- Date of enrolment
- Method of attendance,
- Grade
- Grade date
- Action - Register grade.
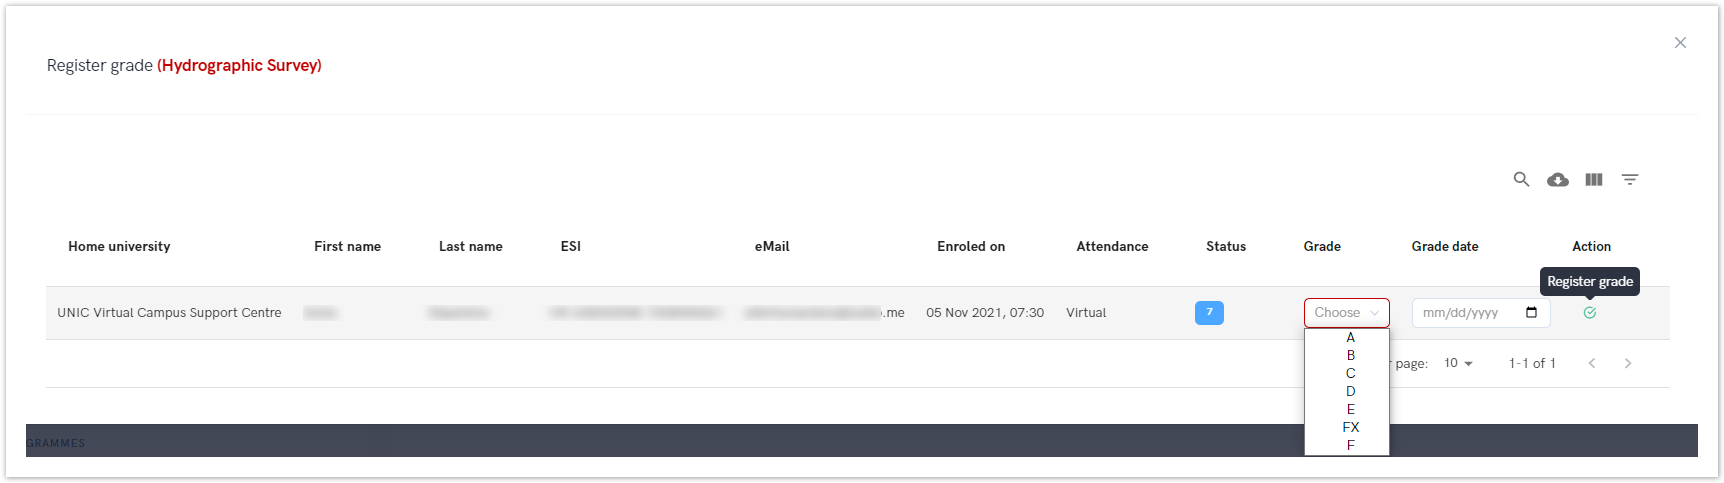
Figure 14. Grading the incoming Student
Incoming finished
View and manage details for students who have completed their courses and received grades.
To view the information, the administrator must set a time interval to filter records.
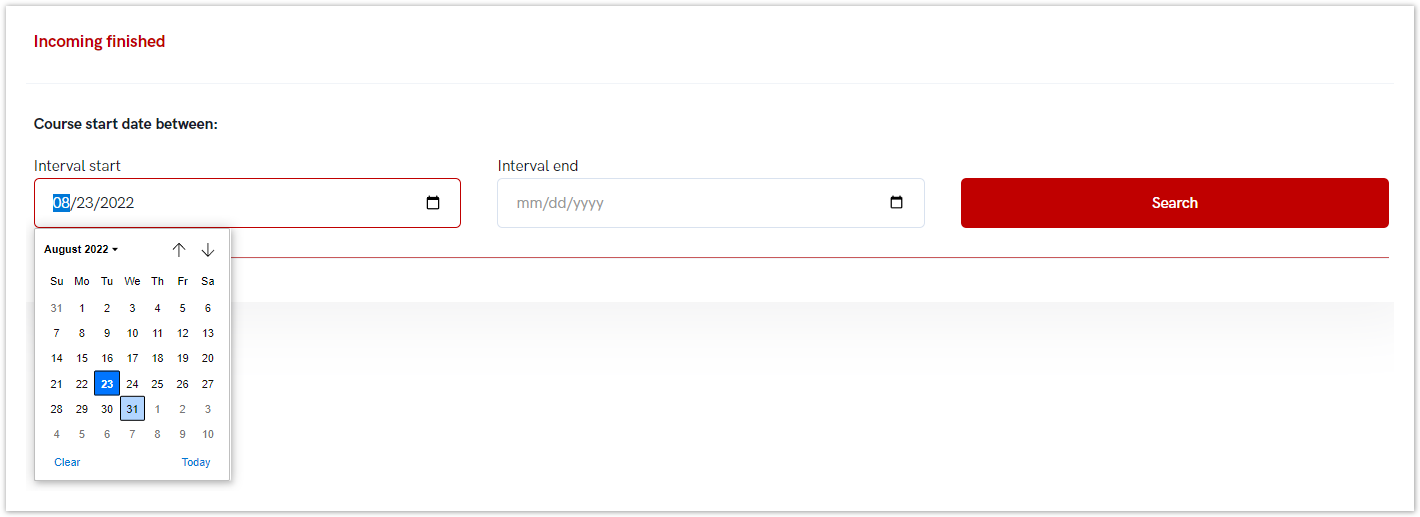
Figure 15. Setting the Desired Time Range
If there are records matching the search criteria, the data is displayed below and the administrator must select the view option to see the details.
In order to view details, administrator must choose the inspect option (plus sign).
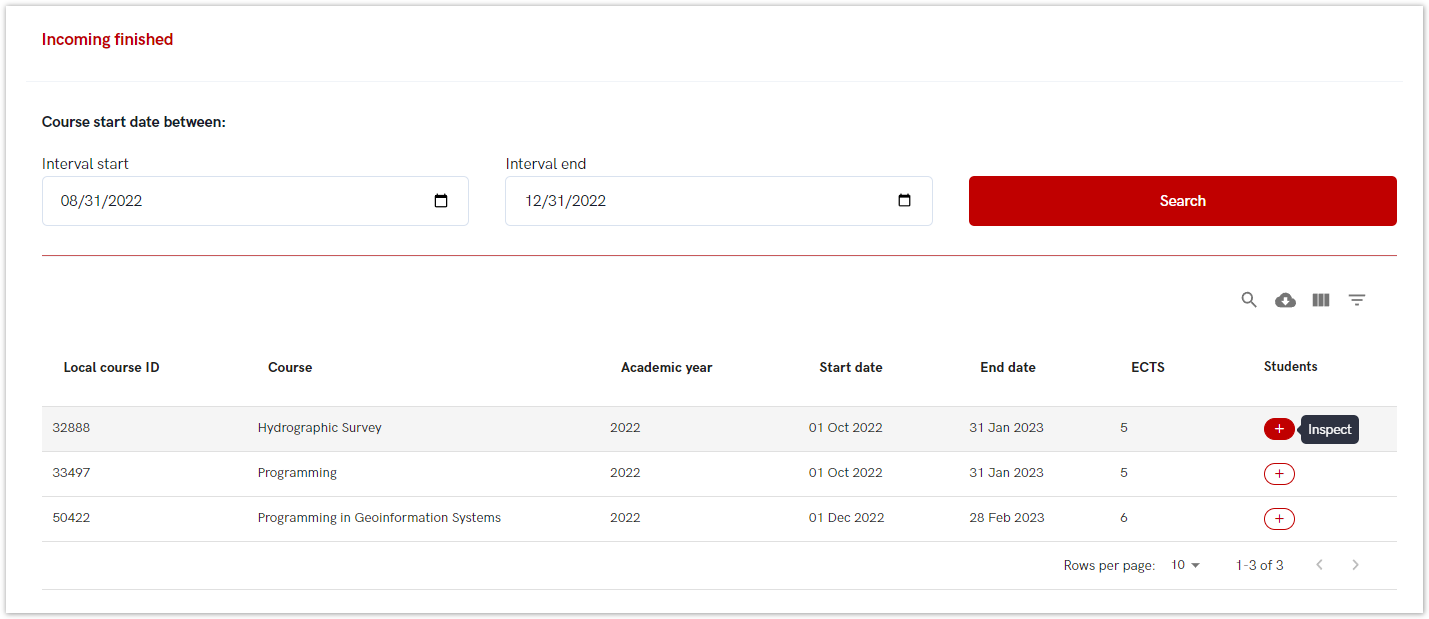
Figure 16. Choosing the Inspect Option
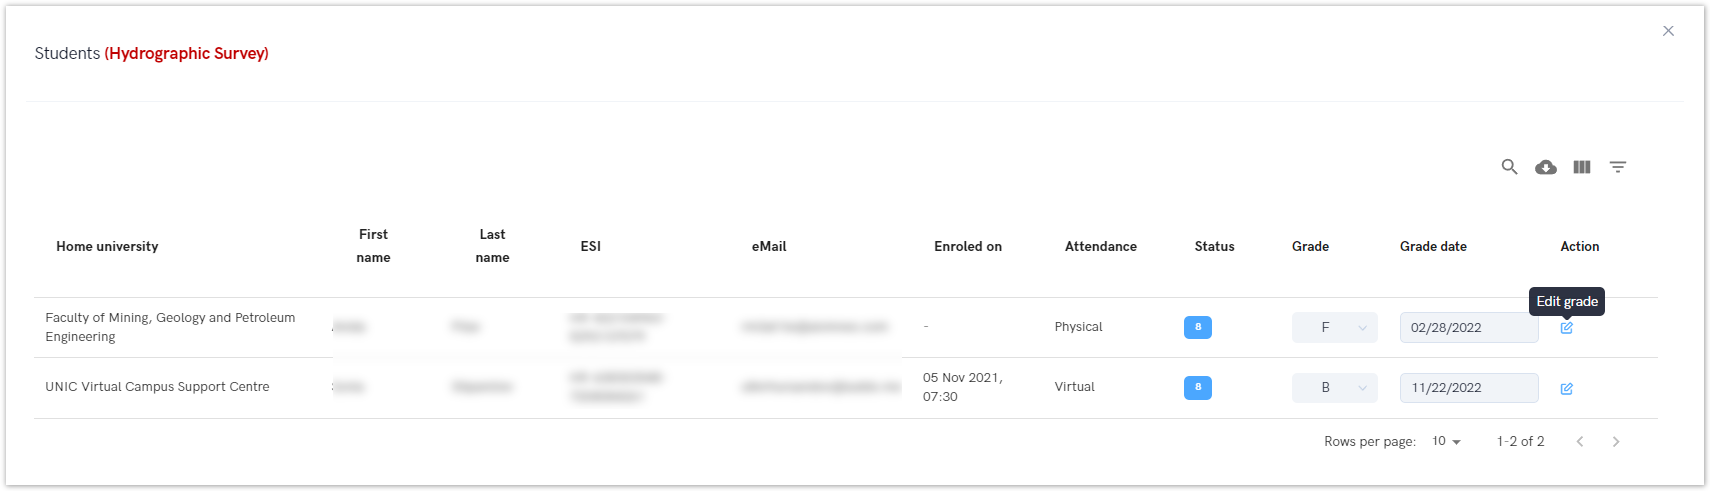
Figure 17. Details about Incoming Finished Students
In order to change the grade or to change a grade date, administrator must choose edit grade option, enter a new grade and confirm the action.
Grading can be done from the start date of the course.
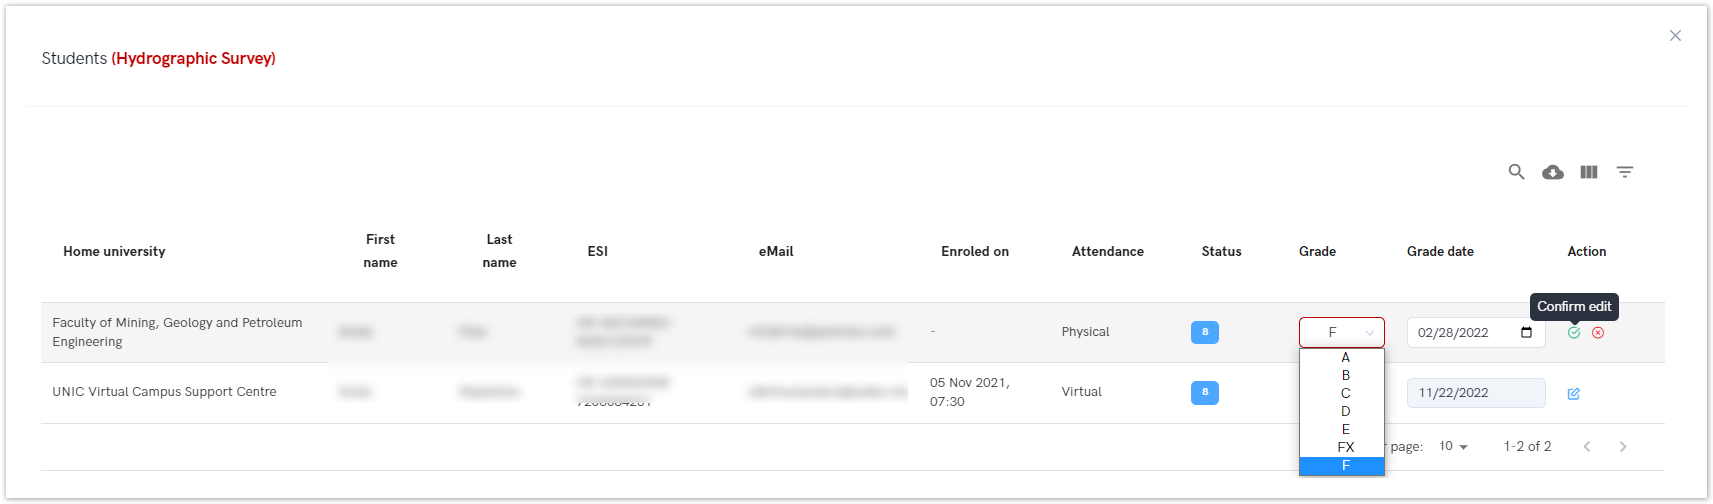
Figure 18. Changing the Grade or Grade Date
Incoming history
Provides an overview of students who applied but were denied or dropped out after the course started more than 30 days ago.
To view the information, the administrator must set a time interval.
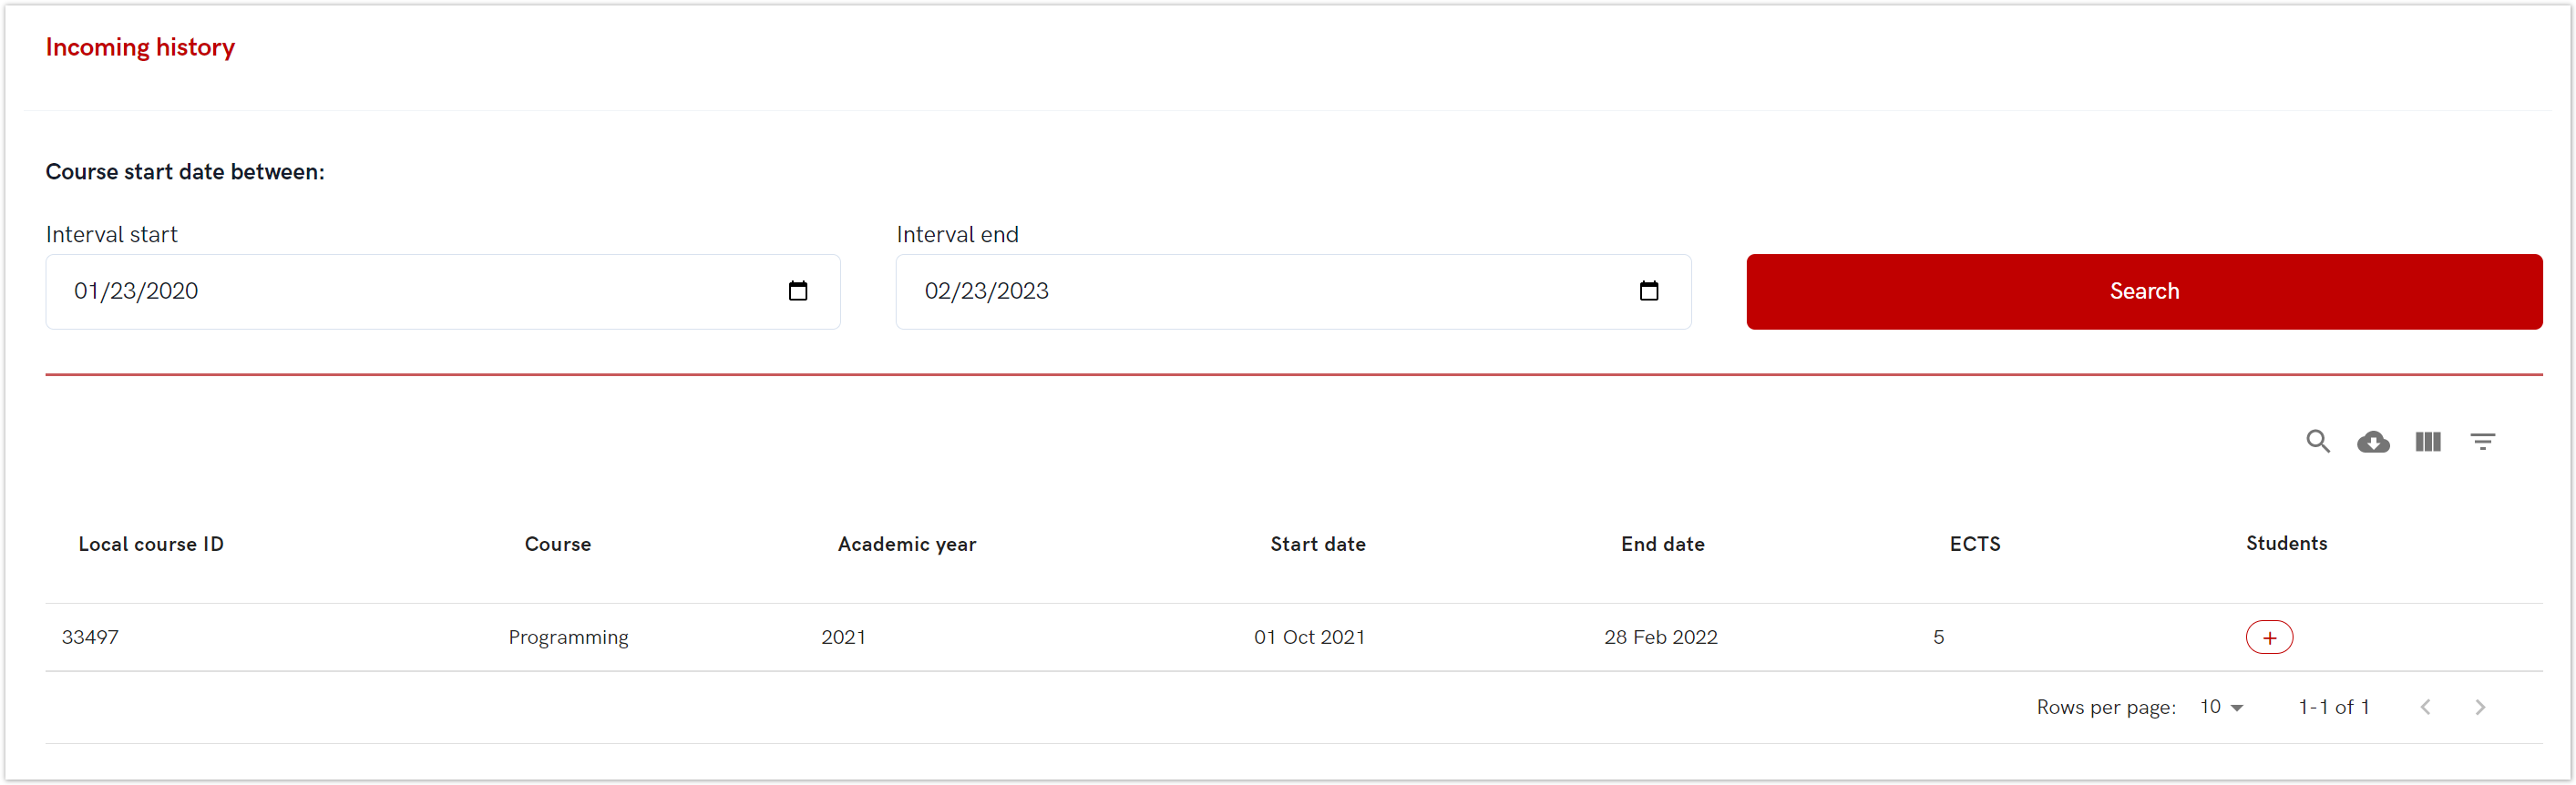
Figure 19. Incoming History Option
In order to view details, administrator must choose the inspect option (plus sign).

Figure 20. Information about Course History for Incoming Students